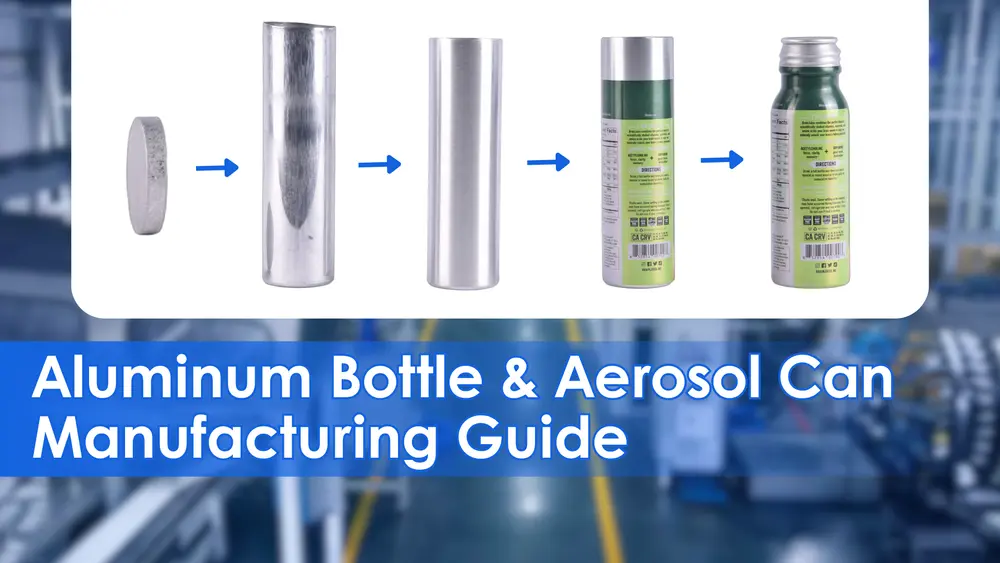
The Art of the Aluminum Bottle: A 10-Step Manufacturing Journey
Aluminum packaging is more than just a container; it is a blend of high-tech engineering and aesthetic design. From a simple metal disc to a sophisticated aerosol can or premium beverage bottle, the production process is a marvel of modern manufacturing.
Here is a step-by-step look at how we transform raw aluminum into the high-quality packaging you see on shelves today.
1. Impact Extrusion: The Birth of a Cylinder
The journey begins with a circular aluminum slug. This raw material is fed into a high-speed impact extrusion press, which serves as the heart of the production line. During the forming process, a punch hits the slug with immense force, causing the metal to flow in a reverse direction between the punch and the die. This creates a seamless, thin-walled aluminum cylinder that defines the initial geometric quality of the product.

2. Trimming and Brushing: Refining the Surface
When containers leave the extrusion press, they are not yet ready for decoration. First, a burr-free cutting process trims the cylinders to the exact required wall length. Following this, the aluminum surface—which often looks rough or striated—undergoes an additional brushing process. This removes microscopic bumps to create a perfectly smooth surface, which is the essential foundation for subsequent lacquering.

3. Washing: Ensuring Pure Adhesion
To ensure that coatings adhere correctly, the surfaces must be chemically clean. The bottles and cans pass through specialized washing machines that use a detergent solution to degrease and clean both the interior and exterior. This step is vital for ensuring that the internal lining and external print stick tightly to the metal without peeling.

4. Accumulation: The Production Buffer
Manufacturing involves various machines operating at different speeds. To prevent a “bottleneck” where one machine stops the entire line, an accumulator acts as a controlled interim storage unit. It serves as a buffer, storing workpieces and passing them on as soon as the next stage is ready, ensuring the production flow remains synchronized even during short standstills.

5. Internal Coating: Protecting the Content
Aluminum is a chemically active metal; therefore, if the container is meant to hold chemicals or food products, an internal chemical treatment is mandatory. The internal coating is atomized and sprayed into the cavity to ensure total isolation between the aluminum and the contents. Beyond protection (such as food-grade or anti-corrosion layers), this coating acts as a lubricant during the final “necking” stage to prevent the molds from damaging the metal.

6. Base Coating: Setting the Stage
Before the brand’s design is applied, a base coat is needed to compensate for any remaining surface unevenness. You can choose between:
- Transparent Base-coat: Highlights the premium, “charming” character of the brushed aluminum.
- White Base-coat: Provides a neutral background that makes printed colors appear more vibrant and saturated.
- Custom Tones: Specialized base coats can even be used to eliminate the “seam lines” often seen in offset printing.

7. Offset Printing: Bringing Brands to Life
We utilize indirect flat screen offset printing to achieve pin-sharp imagery. The ink is first transferred from a printing plate to a rubber blanket before being applied to the rotating bottle. This system supports up to 9 colors. For the best results, Pantone spot colors are used to ensure brand consistency across every unit.

8. Varnish: Protection and Finish
Even the most beautiful print will fail if it is easily scratched. After printing, a transparent varnish (lacquer) is applied to protect the container from mechanical damage and abrasion. This varnish also offers aesthetic versatility, allowing for matte or shiny surfaces, glimmering particles, or even slight color shades.

9. Necking: Sculpting the Shape
This stage transforms a simple cylinder into a container with a slim waist or attractive shoulder. This is one of the most technically demanding steps because the bottle has already been printed and lacquered.
- Material Integrity: The lacquer must be elastic enough to withstand the deformation without cracking.
- Precision Shaping: Several operations gradually form the shoulder, curl the edges, or cut threads for screw caps to ensure a tight seal.
- Tool Maintenance: Shaping tools must be kept “spick and span” to avoid scratching the finished artwork.
- Pressure Resistance: For aerosol cans, the necking machine also performs the crucial task of curving the bottom inward to handle internal pressure.

10. Post-Washing
For clients with rigorous hygiene requirements, such as those in the beverage industry, we perform an additional post-washing step. We use high-pressure, heated deionized water to thoroughly rinse both the interior and exterior of the product. This removes any remaining aluminum shavings or oil residues. The process concludes with a final drying stage to ensure the containers are pristine.

Your Partner in Aluminum Packaging
The journey from a raw aluminum slug to a precision-engineered bottle requires a perfect balance of technology and craftsmanship. At Shining Packaging, we are dedicated to providing durable, sustainable, and beautiful aluminum solutions that protect your product and elevate your brand. Whether you require standard aerosol cans or custom-shaped beverage bottles with high-purity cleaning, our 10-step process ensures excellence in every unit.
